A new feature in v0.92a, you can turn off the menubar on story pages.
How to
- Choose Settings from the system menu (at the right edge of the menu bar).
- Click on the Pages tab.
- At the bottom you should see a checkbox: "Include the menubar on story pages?"
- Uncheck it and click OK.
You must rebuild all pages that you want to change.
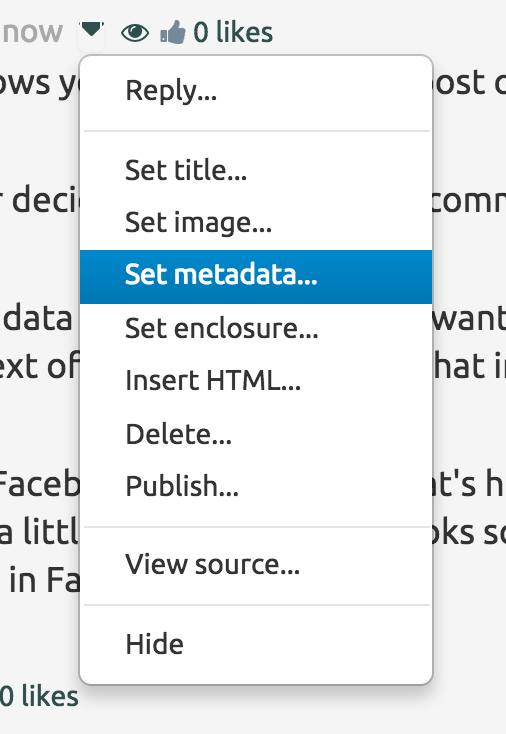
New in v0.91b of 1999.io, there's a new Set metadata command in the popup menu for each post that allows you to set various per-post options, and has room to grow.
In the new dialog, you can set the title, description, link to an image or decide if you want Disqus comments enabled for this post only.
The first three are included in the Twitter and Facebook metadata for the post, so if you want to override the title, or provide a description that isn't the full text of the post, you can do that in this space.
Further, you can set the image that is displayed in Twitter or Facebook with the post. That's how I've been getting my posts to have cool images for each post. It's a little extra work, but it looks so much better. Here's an example of a Twitter post and the same one in Facebook.
Here's a view source of this post to see how the metadata is represented in the JSON for the post.
Here's an idea I want to put out there.
A frequently asked question is this -- how permanent are the test sites on my.1999.io? My answer is not permanent at all. They are really just for testing the product and deciding if you want to use it. If you get serious about it you should run your own 1999.io server.
Now there's a problem. It's pretty easy to set up a server, as far as these things go, but it's still a hurdle that's too high for people who may be good bloggers, who could really make use of the product, but can't get it together to get the server running and keep it running.
A fair number of people have servers running to host a single blog. Each server could easily host dozens of sites without skipping a beat. I wonder if some people would volunteer to let people run blogs on their server, without a guarantee of permanence, of course, but an intention to keep running the server as long as you're blogging. By now you should have an idea of the expense and how much use you're getting from it.
And maybe from that, we can bootstrap hosting services, or perhaps even better, ways to mirror sites at backup servers, so that just a DNS change would relocate it. 1999.io is well-designed for that, because each user's full configuration is in a single JSON file. Easily mirrored.
Anyway, if you're willing to share your server space with some friendly users, post a note here, like a bulletin board. Thanks! 
There's a new command in the popup menu for each post in v0.90w of the editor that allows you to set the Twitter and Facebook metadata for each post.
The three bits you can change are the title, description and image.
This enables you to have a different description for the post in the metadata, having it be a summary for the post instead of the full text which is the default.
You can have a different title, which you might want if you want a clickbaity sort of title, like "The pope met with Zuck and you won't believe what happened next!" Just kidding. 
Finally, you can supply a link to a beautiful image which is displayed when Facebook and Twitter show people your post. This was the main reason for doing the feature.
Examples
You can see a few examples here, here, here and here.
Setup
If you started using 1999.io after Sept 4, you don't need to do anything to set it up, the new default template already has the new macros.
If you're upgrading an existing site, look at the Facebook metadata and Twitter metadata sections of the default template, and do what it does.
The new macros are titleForMeta, descriptionForMeta and imageForMeta.
How to use
Create a post.
In the editor, click on the down-pointing triangle and choose Set metadata from the popup menu. Screen shot.
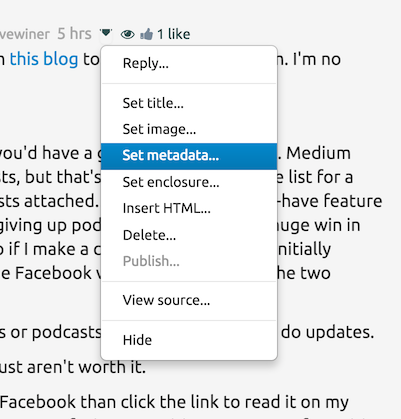
Enter the title, URL of the image and description in the appropriate places.
If you leave an item blank, the default value applies.
Questions here or on the 1999-user mail list.
In v0.90v of the 1999 editor, it's easier to add Disqus comments to a blog.
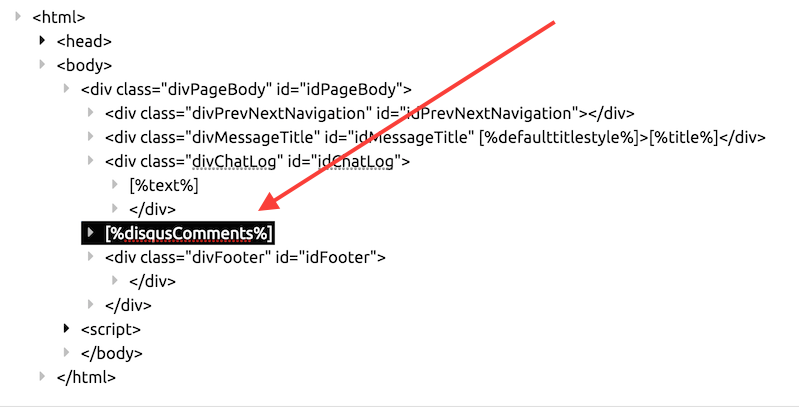
- Edit the template and add [%disqusComments%] after the divChatLog section of the body. It might already be there if you created your site after Aug 29, 2016. Here's a screen shot that illustrates the placement.
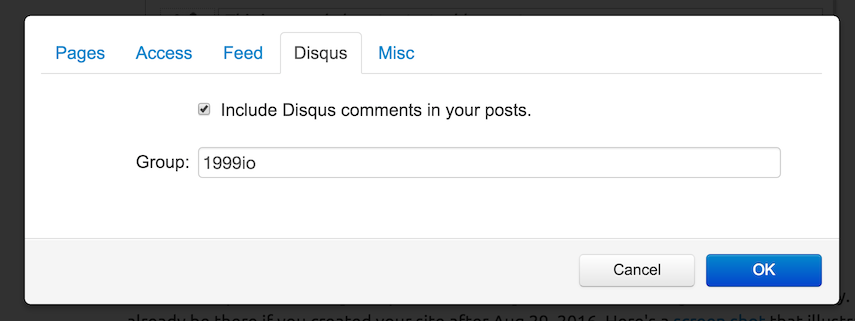
- Choose Settings from the System menu at the right edge of the menu bar. Click on the Disqus tab.
- Click the checkbox to enable the feature. Screen shot.
- Optional. If you have created your own Disqus group you can enter its ID in the space provided, or you can accept the default 1999io group, created for 1999.io users.
- Click OK.
- Edit a post on the site and update it. Click on the Eye icon for the post. if it worked you should see a comments section at the bottom of the post.
If you have questions post a comment here.
When you referenced a glossary item in the text of a post, it would appear to add a blank character after the reference.
So you would end up with text that looked like this 1999.io .
Not good. I looked into why it was doing this and the fix was easy. It was actually adding two extra whitespace characters (CR and LF) after the text.
Now you end up with no extra space: 1999.io.
It was easily fixed by not doing that. 
The fix is in v0.90p.
New in v0.90p.
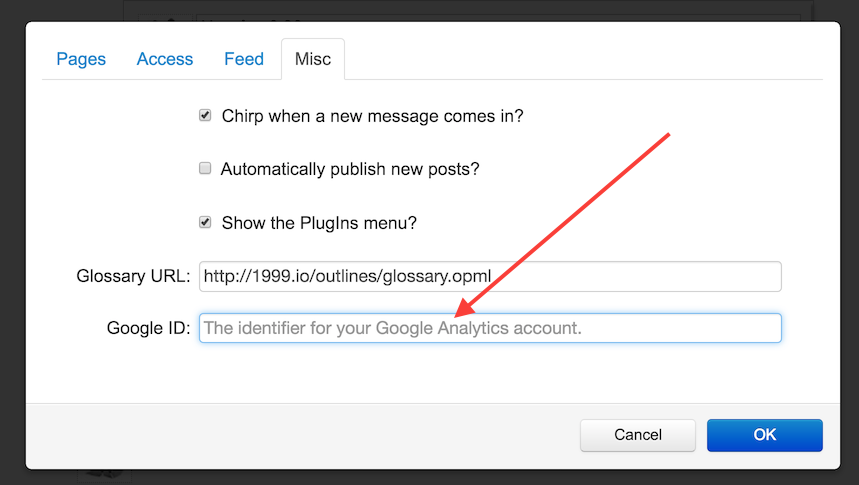
If you use Google Analytics, now you can have it use your account ID to monitor hits to your blog. You can also set the default for all sites hosted on your server.
For users
- If you've got a site on my.1999.io and want to change the Google Analytics ID,
- Choose Settings from the System menu, at the right edge of the menu bar.
- Click on the Misc tab.
- Enter your Google Analytics user ID in the entry box. Screen shot.
- Click OK.
To test, edit a post, save it, then visit the rendered page. It should now show up on your Google Analytics dashboard.
For server admins
Add a new element to the config.json file for your server with the Google Analytics ID you want to be the default for sites hosted on your 1999.io server.
The ID should be here: homePage.googleAnalyticsAccount.
Here's an example config.json that contains the new element.
After saving, be sure to reboot your server. It only reads config.json at startup.
To test, reload the home page of your server to reload the 1999.io editor, then publish a page. Visit it. It should show up in your Google Analytics dashboard.
Your users will be able to override your choice by entering a different ID in their Settings dialog, as explained above.
Here's an example of a blog post that was created by 1999.io.
And here's the template that the page was rendered through.
This gives you an idea of the kind of power the designer gets in this blogging system. It's simple to edit the template. No need to access the server, or in any way work on the back-end.
Maximum power, minimum complexity. Just use your HTML, CSS and JavaScript skills.
One thing I've always wanted in 1999.io are descriptive URLs.
So if I have a story whose title is We Need 140 Different Twitters, i'd like the URL for the story to be something like:
http://scripting.com/2016/07/27/weNeed140DifferentTwitters.html
With v0.90k, we have that feature.
How it works
Before you give a title a post, we use the current form, where the URL is formed using the message ID as the file name.
If you never give the post a title, we just keep using that URL.
If you give the post a title, we generate a URL with the title innerCased, as above, and render the post to that URL.
You can change the title without breaking the URL. That's important.
The original numbered post is left where it is, in case there are any links to it. And in general I don't like software deleting files, esp not automatically.
I am certainly going to use this myself for Scripting News.
I had to quickly scramble to provision a new server, and did so in record time. Far more quickly than I thought I could.
What happened?
I did something daring with Dropbox.
And it didn't work.
And all of a sudden all the users files in my.1999.io were gone.
(I had a backup.)
Were the two events related?
Obviously.
How?
I have no clue.
But it seeeems to be working now.
And I still have a bunch of outages to clear.
Wish me luck.
Still diggin!

How to add Disqus comments to your 1999.io blog.
- First, go grab the text from this page on GitHub. (Copy it to the clipboard.)
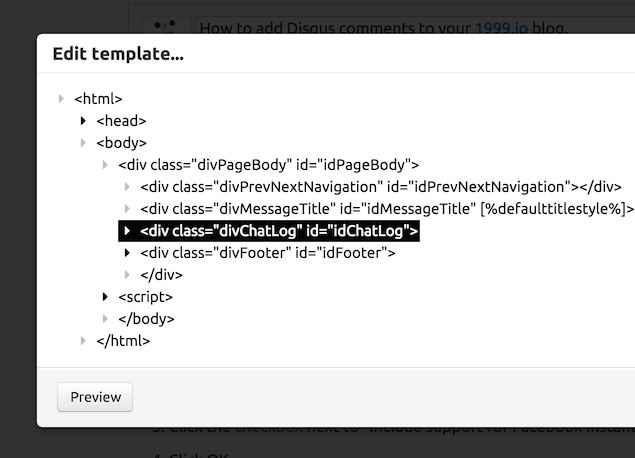
- Choose Edit template from the Main menu in 1999.io.
- Put the cursor on the top headline, <html> and double click on the wedge to collapse it. Re-expand, and navigate to put the cursor on the <div class="divChatLog"> headline, as shown in this screen shot.
- Press Return to open a new headline, and paste the text you copied in step 1.
- Click the Preview button to see if it worked. If it did, back in 1999.io, click OK to save the template.
- To test with one of your pages, edit an item, save it. This causes the page to be rebuilt with the new template. Click on the Eye icon to view the page. You should see a Disqus comments section below the story text.
- Here's a quick video that shows how to do the steps above.
The System menu is at the right edge of the menu bar.
- Choose Settings.
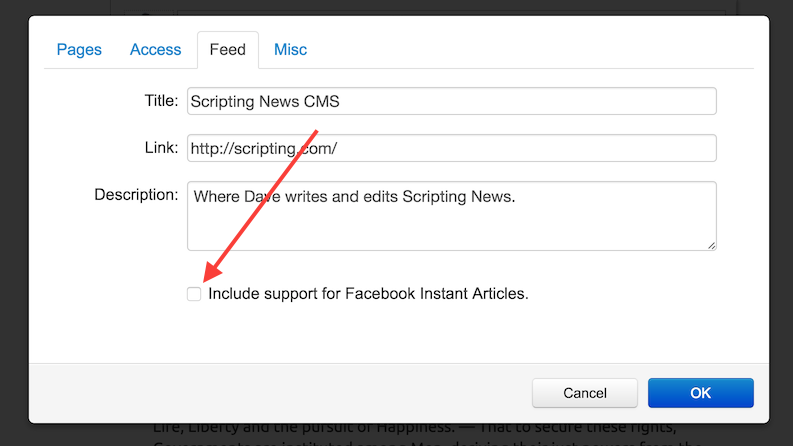
- Click on the Feed panel.
- Click the checkbox next to "Include support for Facebook Instant Articles."
- Click OK.
- Make a change to a post to cause your feed to be rebuilt.
A short video showing how to create a new blog on my.1999.io and create your first post.
Starting with v0.89r, 1999.io maintains a monthly archive page in addition to the home page and story pages.
Here's the archive page for May for this blog.
Part of the change that makes this possible is that the server now returns all the messages of the current month to the editor when it starts up. Without the posts resident on the editing machine there would be no way to build the archive page.
There was a server update too, v0.94s.
How to test
Click on the body of a post to edit it.
Click the Update button.
The current monthly archive page will be rebuilt.
Limit
It only works for the current month. If you rebuild a post in a previous month it will not build the archive page for that month.
I'm playing around with a new feature in the server.
If it works, when you click on this: blog.1999.io -- you should see what used to be at a much longer url. And when you click on the longer url, that might already be linked to from a variety of places, you are whooshed off to the short version.
I found a neat way to implement it, just wondering if I thought of all the problems that could come up.
Update: Here's the howto for this feature.
There's a new much nicer template editor that uses the open source Ace editor. It's the same editor that GitHub uses. It's got some great features. It's not an outliner, and for some people that's a good thing.
Here's a screen shot.
If you're using my.1999.io to do your blogging, you already have the new template editor. When you choose it from the PlugIns menu, you'll get the new editor.
If you're running your own server, the URL of the new editor is this. Replace it in config.json following the instructions on this page.
Today there's a big new feature in both the server and the editor, support for plugins.
And there's a new plugin that's part of the release, the template editor.
If you're running your own server, you will have to configure it to run plugins. That's explained in a new doc on the 1999-project site.
Plugins are already installed on my.1999.io. This doc explains how to get access to plugins in the editor, once they are already installed on the server.
Enable plugins
- Choose Settings in the System menu.
- Click on the Misc panel.
- There's a new checkbox that allows you to show the PlugIns menu. Check it and click OK to save the new setting.
You should now see the PlugIns menu with one item in it, Template Editor.
Important caveat
Unless you have access to the server, once you edit the template with the text editor, you will not be able to edit it in the outliner.
It is not reversible.
You can certainly look at the editor, and make changes, but once you click Update, that's it.
How to edit the template
Choose Template Editor from the PlugIns menu.
The editor opens. Edit it. When you want to save, click the Update button.
The changes in the template won't be reflected in page renderings until you rebuild them. To test it, edit one of your posts and click Update. View the rendered page. You should see the change at this point.
Versions: Server -- 0.94q, Editor 0.89j.
One of the features Frank McPherson asked for in his feedback post was a glossary. He uses the feature in Fargo, my Dropbox-based outliner, but it actually goes back way before that. It was a feature of the earliest web CMSes I did in the mid-late 90s. (Again, why the product is called 1999.)
I already had the glossary in 1999 almost completely done, so I put in a couple of hours over the weekend to finishing and testing the feature and now in v0.89g, it's released.
The basic idea
Think of the glossary as a two-column table with strings in each column.
When we "run" text through the glossary, we look for occurrences of strings in the left column and replace them with strings in the right column.
It's like the glossary in the back of a book, but for writing.
It's useful for links that might change, as an example. So I could create a glossary element that's triggered by "Wikipedia" and when it appears in text, it's replaced with Wikipedia. That way in the unlikely event that the site moves, I can just change the definition in the glossary and rebuild.
It's also good for saving work!
How it works in 1999
There's a new setting in the Misc panel that lets you enter the URL of an OPML file that contains your glossary. Here's a screen shot of the panel, as I have it set up on my blog.
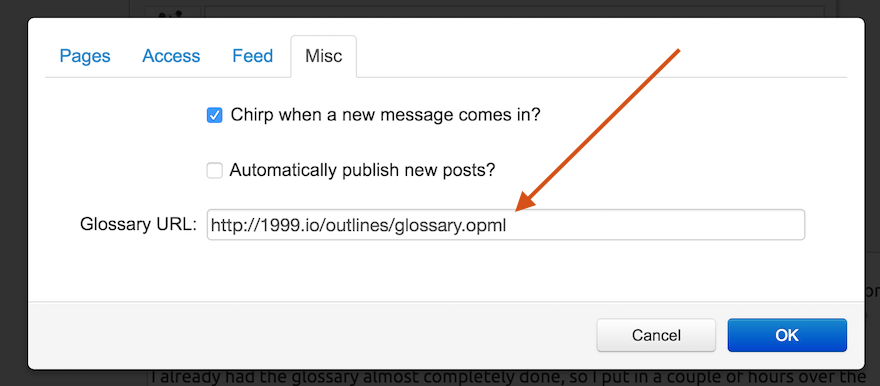
This is a link to the OPML file it points to.
When 1999 launches, it reads the file, and uses it to compile the glossary table. Then whenever it you save a post it passes the text through the glossary, doing the substitutions it calls for.
The OPML file is organized so that the top-level items are the terms (the left column) and the text subordinate to the items are the definitions (the right column).
When you edit the OPML file, you have to reload 1999.io to get the changes to show up in 1999. It isn't watching the file for changes.
You also have to reload the 1999.io app when you first enter the URL in the Settings dialog.
You can use Fargo to edit your OPML files. It's possible at some point we will have a glossary editor inside 1999.io, as we have one for templates and menus.
Glossary substitution is case-insensitive.
This short video shows how to add an audio podcast to a 1999.io blog post.
- Upload the media file and copy the URL to the clipboard.
- Choose Set enclosure from the popup menu on the post.
- Paste the URL of the media file and click OK.
- When you publish the item, the feed will contain an enclosure element for the podcast with the length and type attributes properly set.
On the 1999-server mail list I asked for feedback on the product.
There were several very useful responses in the form of blog posts. Here are links to the posts and my responses follow.
Scott Hanson says it's simple.
Jack Baty is a former Frontier and Fargo user.
Frank McPherson has specific feature requests, all of which are good ideas, and some are even being planned at this time.
Archives
I had the same concern as Jack re archives and what happens when you get over 1000 messages (an arbitrary number). He says that no one has hit that yet, but I did. On Scripting News, and I figured out what to do about it.
I wrote a script that breaks the JSON file up into months.
You don't need all the messages to be in the chatLog.json file for it to work. It works fine with just the last month's files in it.
What I don't have now is a way to display a single month's file, but that won't be hard to do. It's basically just a repurposing of the code that generates the home page.
I tested this just before inviting you guys to run servers. It's the last thing I wanted to be sure I knew how to do before inflicting this on anyone else.
Themes
About themes, I very much want to do that. But first people have to start playing with templates.
I don't want to lock anything down re themes until there are one or two designers working on 1999 as a design platform.
Bryan Bell led this effort in Manila and Radio. It would be ideal if I had someone to work with like that. It's a whole other dimension, and I am not that kind of designer, but I always am on the lookout for blog templates that work on other systems.
Right now all 1999 sites I've seen look like mine. We should try to make that not true.
This should be one of the areas that 1999 shines in, because it's both very flexible, and to design templates requires no knowledge of how the technology under it works. So we should be able to accomplish quite a lot here.
So someone should dig into this and start reporting either success or problems with template work. Let's shake that part of the product out.
I also have a doc on that.
Anyone with experience working with Manila or Radio will immediately understand that doc, imho.
Simplicity
You all really nailed what the product is about and about the design of it.
I found I had ideas that didn't fit in Twitter and didn't belong on my blog. Too long for Twitter, too short for a blog post.
I was aware of this frustration almost from the beginning with Twitter. I used to have a good way to do this before all that, I used an outliner to write Scripting News, and it quite elegantly handled long and short form posts in one document.
My goal with "1999" was to move all the extra stuff out of the way, and achieve the simplicity of Twitter and Facebook, yet have all the options of a good blogging system.
It's such a natural place for me to write that I also write my long-form stuff there.
But for really serious docs, I use the OPML Editor. I need all the power of the outliner, for big writing jobs. Like all the docs on the 1999-project site. All OPML.
Now you can launch a 1999.io server from an Amazon AMI.
It's even easier than the basic Ubuntu setup, because I've done most of the installation for you. It just needs a few bits and you're ready to go.
Note: These are not poet-level instructions, they're for people with a little experience setting up an AMI and DNS.
Here's the how to...
The AMI is ami-abcd2fc6. It's public.
It can be a micro instance. And it should qualify for the free tier, meaning if you're new to AWS you can run it for free for a year.
These ports should be open -- 22, 80, 81, 1999, 2000.
You should assign a domain to the IP address allocated for the server. That will be the value for myDomain in config.json.
Once the instance is running, edit config.json, as explained in the howto, change myDomain, twitterConsumerKey and twitterConsumerSecret as explained in the setup howto. (You don't have to create it, it's already there.)
Map port 80 to port 1999. Here's the magic incantation that does that:
sudo iptables -t nat -A PREROUTING -p tcp --dport 80 -j REDIRECT --to-port 1999
I went through these steps with the AMI, and it worked.
Now when you choose the Insert HTML command in the popup menu on each item, the text is inserted at the cursor location instead of at the beginning of the text.
If there's a selection the HTML replaces the selected text.
I had to figure out how and when to save and restore the selection, because pulling down the menu temporarily loses the focus on the editing object.

There was a problem with the way one of the operations on the server worked. This was caught by two of the server tester people, and their reports were excellent, took me right to the problem.
It was a tricky one, because to make the change required a change in the client code. And the server had to work with un-updated clients and updated clients had to work with un-updated servers. And of course updated server had to work with updated clients, and in that case the bug is gone.
And it's all automatic! So there's that...
This will be the first such automatic update. And if it works it sets up a template for all subsequent updates.
v0.88w is the new version of the client software and v0.94f is the new version of the server. If you're running both those version and you are able to create and edit posts, then it's all working a-okay.
In the previous release if you chose the Insert HTML command but weren't editing the post, the command would fail. Now we open the editor before doing the paste.
In the previous release if you scrolled down while you were editing, you could lose changes. The "infinite scrolling" feature in 1999.io, loads items from the server if you fall off the bottom. That's what was causing the problem. So now when you try to infinite scroll when you're editing, nothing happens. Changes now should be safe if you forget to save before adventuring off.
BTW, while we're still debugging 1999.io, I get in the habit of doing a Select-All and Copy before doing anything that I fear might lose data. These days it almost never happens, but it used to do it a lot in the early days! I still am in the habit of making the copy, just in case. The feeling of writing something good and to know it's gone forever is not a good feeling.
Along with the Insert HTML command, demoed in this video, there was another quiet change in the way the editor works in 1999.io.
Previously, I had been using a snapshot of medium-editor, which is the editor we use. I wanted to hold it constant as I worked out the bugs in the environment around it that makes up 1999.io.
But now that things have settled down, it's better if we always have the latest stable release of the editor. So now we use their CDN to get the code for the editor, and every time you reload the editor, you're possibly getting an updated version.
So far so good! I don't see any changes in performance, which is how I like it. But now when they have bug fixes we will get them as well.
Also, this change only applies to the browser-based version of our editor. The app version will only be updated when the app is rebuilt. It stays constant.
There was a change in v0.88t in how the ChatLogs menu works.
First, what is the ChatLogs menu?
It's the menu that's after Docs that confuses the hell out of a lot of new users. And rightly so. When you first start out there's just one item in the menu. It appears both in the title of the menu, and it is the single checked item within the menu itself. There's no point even pulling the menu down because there's nothing you can do with it. It's just standing by for the day that there are other chatlogs on this server that you can participate in.
One of the cool things about 1999.io that I hope people use, is the ability to have group blogs. That's why they're called chatlogs, btw.
So if the day ever comes that you can participate in another blog, then the menu will re-appear, listing the ones you can participate in. And then when you choose different items in the menu the context will switch.
There is only one owner of each chatlog. He or she is the only one who has access to the Settings command. But other people can create and edit new posts, and reply to posts.
You can control when 1999 publishes your posts.
By default an item is published as soon as it's first posted.
When it's published it appears on your blog's home page and in your RSS feed.
You may want to change the default. To do so, choose Settings from the System menu at the right edge of the menubar, and click on the Misc panel. Uncheck the box next to Automatically publish new posts? and click OK.
Now, to publish you have to explicitly do it for each post. There's a command in the popup menu that publishes the item it applies to. Before publishing it confirms that you want to publish it.
The default makes the most sense for new users, so they don't have to find the Publish command to have an item appear in their feed. But if you're using 1999 regularly you probably should turn the auto-publish feature off, so you can finish editing your posts before they appear in the feed.
Minor change in v0.88r -- the links in the title line of a post now open the links in a new browser tab.
I had learned to right-click on the links, always thinking i should just change the way this works. So I changed it.
This works for the title or the eye icon in the title line.
You should be able to use the 1999 app for Macintosh with your own 1999 server. Here's how.
1. Open the app.
2. If you're signed on, sign off.
3. From the system menubar, in the Window menu, choose JavaScript console.
4. Click on the Console tab.
5. Enter this one-line script, replacing the address of the server with the address of your server, and press Return:
localStorage.urlTwitterServer = "http://my1999server.org:1999/"
6. Quit the app and re-launch.
Now when you log on you should be logging on to your server.
If you want to return to my.1999.io type this one-line script into the console:
delete localStorage.urlTwitterServer
If you have problems, please report on the 1999-server list.
Now that the New York primary is over..
I'm pretty confident that the server side of the 1999.io project is under control. There still is that one outstanding issue that Jack Baty reported with the problem with editorPrefs.json. It doesn't seem that Frank's problem is the same one, but it was hard to tell from the report. In any case, let's keep an eye open for that problem. I may add some special error reporting for that situation to api.js.
I think it's getting close to time to offer free hosting to Scripting News readers. At first there I won't be pushing it too hard. I'll just write a simple blog post saying the software is now open for testing by users who are not that technical. I want to get a few people using it just from that perspective. People like Ken Smith, who has been very quiet on this list, but who has been quite helpful in other contexts. Ken can get a server going, and has, but he's an English professor, and more of a prototype of a "poets" type user.
I want to fix some more bugs, and get in a groove on the end-user-experience the way we worked on the server side in the last few weeks.
So I have started a new list! It's called 1999-user.
https://groups.google.com/forum/?fromgroups#!forum/1999-user
I would like many if not most of you to join that list, but that list is ONLY for discussion of features that show up in the user interface, not technical issues that come up when running a server.
We've had lots of experience with this, going back to the early days of Frontier -- if you put users and programmers together, and if the programmers talk about tech stuff, the users won't say anything. But you guys are also users of the software, so you can help me help them. Hopefully there will be enough to make it interesting.

Now there's another way to create and edit posts for 1999.io -- using the 1999 app for the Mac. Here's how to do that.
- It's only available for the Mac. There may be other platforms supported in the future.
- Download the app. Show it in the Finder.
- Right-click on the file and choose to open it with the Archive utility. (This step may not be necessary, depending on the browser you used to download the app.)
- You should now have a file called 1999.app. Double-click on it.
- You may get a security warning that prevents you from opening it. Open the System Preferences app, go to the Security & Privacy panel. There should be an option at the bottom of the General tab that allows you to run the app.
- Now with the app open, you should get the default screen for 1999.io, asking you to sign on to your Twitter account. Do it exactly as you would for the web version. If you had already used 1999.io on this computer you might have to sign off first.
- You're now logged onto your chatlog on my.1999.io. For now, the app can only work with sites on that server. Once we've shaken out any problems, I'll add a feature that lets you point the app at your own server.
If you have any questions or problems come up, please post a note on the 1999-server list.
Hope you like it!
Update 4/15:
Thanks to the early testers on the 1999-server list. In the first release the app didn't support the clipboard. Cut, copy and paste didn't work. Turns out the reason is that there wasn't a system-level Edit menu, which is required for the clipboard to work.
Also, there was no way to open the JavaScript console, which is essential for error reporting. At this stage in the product cycle, not having this available to users is a big problem. If you see something behaving badly in the app, choose JavaScript console from the Window menu. You may see some error messages there that could help us figure out what's going wrong.
Update 4/16:
The desktop app now has a version number. This is v0.40a.
The About command in the system-level menu now tells you about this app, not the Electron environment. (We mention Electron in our version of the box.)
Most important, all the extra windows and browser tabs that were created when you authenticate should now be gone. In fact, it's even better, the entire authentication process appears to take place entirely within the Electron app. In reality, three servers are involved, and one client. Amazing how much is going on in such a small space.
Update 4/18:
This is version 0.40b.
The only change in this version has to do with how the app opens URLs.
In the previous release, URLs pointing to external pages would open in the app itself. There was no way to get back. And this isn't right. Those pages should open in your default web browser. So I made that change.
But it's tricky, because the same code has to open URLs in the app itself when you're authenticating with Twitter. So there's an internal flag, and setting it is tricky, so there could be problems.
To test, log off and back on again. If it worked, we passed the first test. You might want to try this several times to be sure. It's the kind of thing that if it fails it will do it intermittently.
Then create a post with a link in it, say to scripting.com. Update the post, then click the link. DId it open in your browser, not the app? That's good.

As you may know, you can add a small image in the right margin of a post, as I do on my blog, by using the Set image command in the popup menu for the post.
When you choose the command, enter the URL of a smallish image, usually not more than 150 pixels wide. The image will be displayed in the right margin.
This post has an image of a racehorse in the right margin.
Update 4/14/16: I added a small feature in v0.88m that allows images to flow through the Twitter and Facebook metadata.
Unfortunately Facebook will reject the image if it's less than 200 pixels wide, which makes this not very useful.
Twitter will include the image, and scale it to fit the space it has. It won't look beautiful, but it's better than having no picture at all.
If you don't want this feature, simply edit the template for your site and remove the image inclusion tags.
Every item in a chatlog is rendered onto its own story page. To get from the item to its story page, click on the eye icon in the title line over the item.
You can change the style of rendering in several ways:
- Edit the template.
- Edit the menu bar.
- In Settings, the Pages panel lets you configure the title, home page URL, copyright string, and other values that appear on the story pages.
Editing the template
Each site (or chatlog) has one template that all pages are rendered through.
You can change the structure of the page, include different script and CSS files, or add scripts and CSS directly in the template. You should know what you're doing, of course.
When you edit the template, any pages that have already been rendered should be re-rendered. That's what the Re-publish all pages command in the Main menu is useful for.
Editing the menubar
You can edit the contents of the menubar on each of your story pages by choosing the Edit menubar command in the Main menu.
Each top level item in the outline is the title of a menu, and each first-level item is a link. To add a link click the Link button, and paste the link and click OK.
The first time you edit the menubar, you need to rebuild all the pages to use the newly created menubar. However, you only have to do this once. The menubar is read each time the page is loaded.
Using the outliner
The menubar and template editors are outliners. For information on how to use an outliner, see this doc on the Fargo website.
Static or dynamic?
It may appear that pages generated by 1999.io are dynamic, because the updates from the editing system flow through to the rendered pages in real time.
Even so the pages are static. That means you can copy the files to a static folder and turn off the server. Or you can use S3 to store the pages and they will still be viewable if your server goes offline. The design is meant to be resilient and future-safe.
However this means that if you change your template you have to re-render the pages for the changes to take effect.
Basic terminology for talking about 1999.
The place where you create and edit posts is called the editor.
Each item is rendered onto a story page.
People can reply to a story.
The most recent stories are displayed on the home page.
Stories are published or not. By default all stories are published, but there's a setting that makes them not-published by default.
All your published stories appear in your RSS feed.
The collection of all your posts is called a chatlog, in some places a blog.
The 1999.io server software is written in JavaScript and runs in Node.js.
There's a powerful editor that runs in the browser, of course it is also written in JavaScript.
You can run your own 1999 server, or you can create a site on someone else's server.
There's a complete API, so other developers can build their own blogging tools. The API is JSON-over-HTTP. There are easy interfaces for the API for JavaScript.
The server software is open source, MIT License. The editor is not open source.
On the back-end there is no database, just folder structures of JSON, HTML, RSS and OPML files.
The pages are "live" meaning they display all updates instantaneously. This makes 1999 ideal for liveblogging applications, and since it's the first blogging software to have this live connection it probably will inspire some wholly new applications. We use standard web technology for this feature.
All users have full access to all the underlying data of their blogs. There's a single command in the Main menu for every blog that downloads the full JSON representation of all the data for their blog, exactly as it's stored on the server.
We use Twitter for identity. It's a very practical system, and easy and quick for server operators to hook into. However the data is stored on your server not Twitter's.